Social Status Review 2026: The Leading Social Media Analytics Tool?

Welcome to my Social Status review.
Social Status is my go-to social media analytics tool. I’ve been using it to track, analyze, and report on my social media campaigns for months, and I’ve learned a thing or two about it in that time.
In this post, I’m going to share my honest review of everything Social Status has to offer—the good, the bad, and the ugly.
I’ll explore all its key features and show you how they work, reveal my take on its biggest pros and cons, and tell you everything else you need to know.
What is Social Status?
Social Status is a dedicated social media analytics and reporting tool.

You can use it to analyze and report on the performance of all your social media profiles, posts, ads, competitors, and influencers from one place.
No more piecing together insights from a bunch of different social media platforms. Just connect your accounts, and let it pull performance data from all the major social networks—including Facebook, Instagram, X (formerly Twitter), LinkedIn, and YouTube —into a single dashboard.
It’s not the only social media analytics tool on the market that can do that, but it might just be the best, offering extra metrics, deeper insights, and more powerful reporting than its competitors.
That said, it isn’t perfect. Every tool has its drawbacks, and Social Status is no exception. We’ll talk more about what those are later.
First, let’s look at the key features.
What features does Social Status offer?
Social Status offers four different analytics tools rolled into one, plus a reporting tool. Here’s what you get:
- Profile Analytics
- Ads Analytics
- Competitor Analytics
- Influencer Analytics.
- Reports
Next, I’m going to let you look over my shoulder as I try out all of these features to give you a better understanding of how they all work together.
Let’s dive into it…
Getting started
The first step to getting started with Social Status is to connect your socials.
After logging in for the first time, select Profile Analytics in the setup wizard.
Then, follow the instructions to connect all the pages and profiles you want to manage. You can also connect your ad accounts and select influencers/competitors to track—but more on that later.
Note: Social Status supports Facebook, Instagram, LinkedIn, YouTube, TikTok, and X. However, you won’t be able to connect TikTok and X accounts if you’re on the free plan.
Once you’ve connected your socials, you’ll be brought to your dashboard. You can use the sidebar on the left to navigate between Social Status’s four analytics tools, plus the reporting tool.

We’ll look at each of these in turn. Let’s start with the Profile Analytics tool, as that’s Social Status’s core feature.
Profile Analytics
From the sidebar on the left, select Profile Analytics. This is where you track and analyze all the social media accounts you admin.
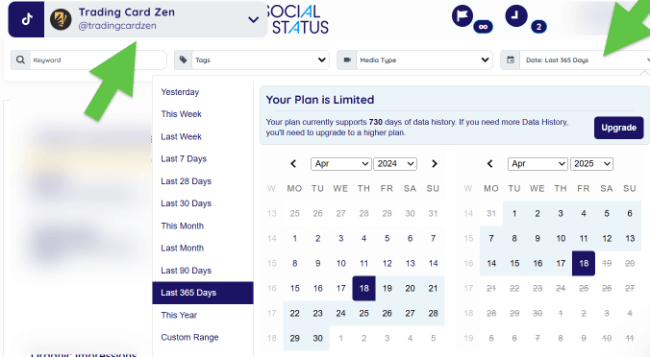
First, use the dropdown at the top to select the specific profile or page you want to analyze.
Next, use the filters at the top to select a time period and/or choose the type of posts you want to analyze (e.g., only photo posts, only video posts, or only posts featuring a specific keyword or tag).
Social Status will then serve up a bunch of useful data and insights.
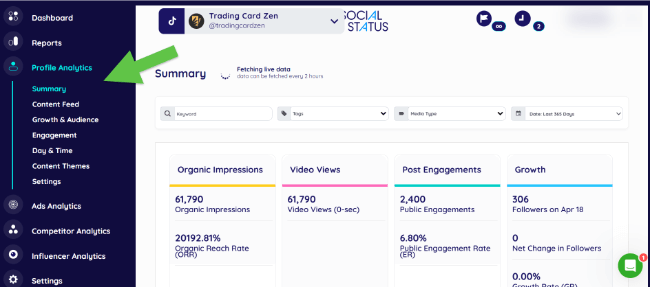
On the Summary page, you’ll see an overview of the key performance metrics—these will depend on the network you’re analyzing.

For instance, for Instagram, you can see metrics like organic impressions and organic reach rate (ORR), Reels views, private and public post engagements, average engagement rates, followers, net change in followers, follower growth rate, and more.
For YouTube, metrics include video views, video view rate, public engagement rate, subscribers, subscriber growth rate, and so on.
If you’re not sure what a metric means, just hover over it and Social Status will explain what it is and how it’s calculated, which is a nice touch.

It comes in useful if, like me, you don’t know what the difference between a private and public engagement rate is.
Below the performance metrics, you’ll also see an overview of your top posts, alongside their performance metrics.

You can click on any post here to open it up in a new tab.
Content Feed & Content Themes
For a closer look at individual posts, open up the Content Feed from the sidebar (underneath Profile Analytics).
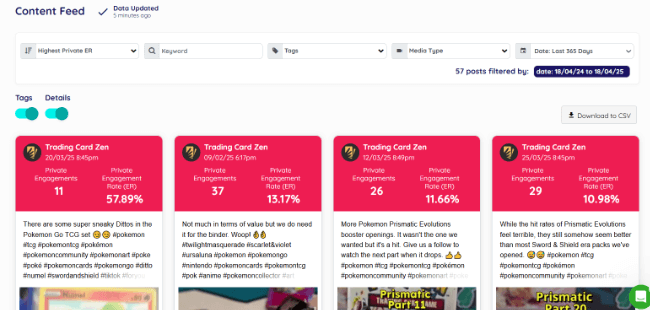
Here, you’ll find a running list of all your posts.
Again, you can use filters to narrow it down. Plus, use the dropdown menu in the top left to sort the list by any metric—likes, engagement rate, shares, saves, and impressions—allowing you to quickly find your best and worst posts.
Another neat thing you can do here is add Tags to your social media content.

This is useful as adding Tags allows you to bucket related/similar posts together for group analysis in the Content Themes tab.
Open it up from the sidebar, and you’ll see a bunch of graphs and charts that show you the distribution of content themes (Tags) by posting frequency and private engagement rate.
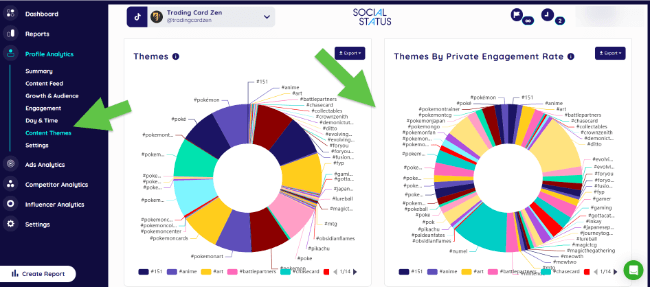
For instance, I can see at a glance that TikTok posts on @tradingcardzen that are tagged #ditto, #numel, and #pokemonggo have the highest average private engagement rate.
So, this tells me I should probably post more content with those themes if I want to get more likes, comments, and shares.
Day & Time
I really like the Day & Time tab of the Profile Analytics report.

It provides data that can help you to pinpoint the best time to post on each social media platform for maximum reach and engagement.
The Day of Week chart shows you how often you post on each profile on each day of the week, while the pink line on the chart is the average engagement rate you get on each of those days.
Below that, the Time of Day chart shows you your average number of posts and engagement rate by both day and time.

The larger the bubbles, the more posts. The darker the shade, the higher the engagement rate.
And at the bottom, there are a couple of cool visualizations that show you the same data but in a 24-hour clock-style bubble graph.
There are a few other useful tabs in the Profile Analytics report that give you more detailed insights into your growth, audience, views, engagement, and so on for each platform.
Unfortunately, we don’t have time to cover everything, so let’s move on.
Ads Analytics
The Ads Analytics tool is where you analyze your paid social media performance.
You’ll need to connect an Ad account to set it up, which you can do from the main dashboard area.
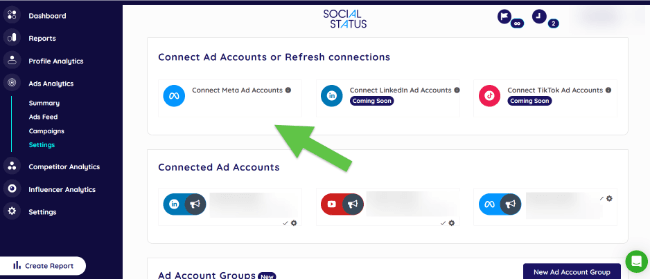
Right now, Social Status only supports Meta Ad Accounts, but LinkedIn and TikTok Ad accounts are coming soon.
Once you’re connected, click Ads Analytics in the sidebar to open up the tool.
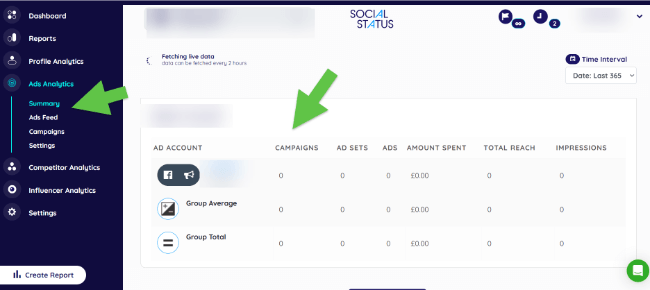
From here, you can view insights into all your Meta Ad campaigns in one place. It supports all 14 ad objectives and all 5 ad placements (Facebook Feed, Instagram Feed, Stories, Messenger, and Audience Network).
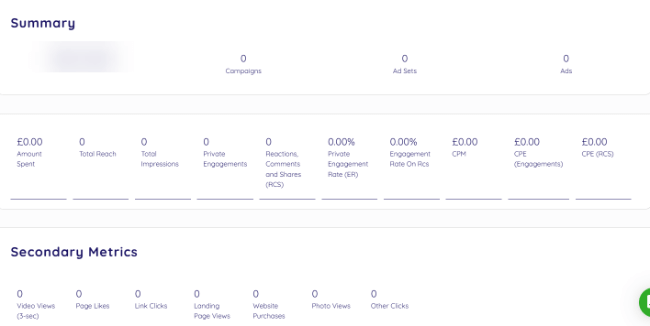
The Summary page gives you an overview of key metrics like your campaigns, ad sets, amount spent, total ad reach, etc. You can change the time interval using the drop-down in the top right.
The Ads Feed tab gives you a closer look at individual ads, similar to the Content Feed tab in the Profile Analytics tool.
Each ad appears alongside metrics like link clicks, landing page views, cost per action/click, click-through rate, and so on.
You can sort by all sorts of KPIs, including impressions, reach, engagements, CPM, CPE, etc., to find your best- and worst-performing campaigns. Plus, filter by keyword, objective, platform, and more.
The Campaigns tab gives you a breakdown of each campaign. Again, you can evaluate and compare them with important metrics like amount spent, CPM, CPE, engagement rate, reach, etc.
Competitor Analytics
The Competitor Analytics tool is one of my favorite things about Social Status. You can use it to see what your rivals are doing on social media and benchmark your performance against theirs.
To get started, open it up in the sidebar. Then, enter the competitor profiles you want to track/analyze on each platform by copy-pasting their profile URLs or searching for their name. You can add as many as you want within your plan limits.
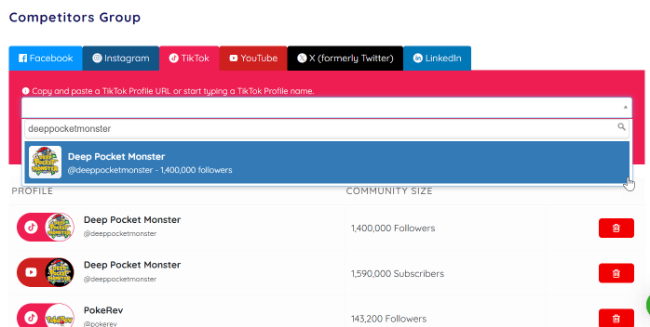
If you’ve done this right, you’ll see a list of all the profiles you’ve added alongside their follower/subscribe count at the bottom of the page.
Next, click Finish and go to the dashboard to head back to the Competitor Analytics tool.
You’ll now be able to see all the same kind of insights you get about your own accounts in the Profile Analytics tool about your competitors.

That includes an overview of their key metrics: posts, community size, video views, engagements, engagement rate, etc.
Plus, access deeper insights into all their posts in the Content Feed.

I like to sort this by highest video views to find out which of their posts went viral, then use that to come up with ideas for my own page.
As with Profile Analytics, you can also analyze your competitors’ post categories under the Content Themes tab and find out when they’re most active in the Day & Time tab.
Influencer Analytics
The Influencer Analytics tool allows you to discover and evaluate influencers you might want to partner with in the future, and track the performance of your current influencer marketing campaigns.
To get started, search for and add the influencers you want to analyze on each platform.
You can do this from your dashboard or the Settings tab under Influencer Analytics. Note that you can set up influencer groups to bucket similar/related creators together.
Next, open up the tool, choose the influencer group you want to analyze from the dropdown at the top, and select the period using the dropdown menu on the right.

You should now be able to see all sorts of useful insights into their accounts, including their community size, engagements, engagement rate, video views, etc.
If you’re collaborating with one of the influencers for a joint campaign, you can have them connect and share their profile access with you via Social Status. Once you do, you’ll be able to access private metrics like impressions and private engagement rate, too.
You can switch between different tabs in the report for more detailed insights into different aspects of their performance, like their growth & audience, impressions, engagements, link clicks, content themes, and so on.
Plus, open the Content Feed tab for a comprehensive overview of all their posts.

Reports
Last but not least, let’s look at the Reports tool. This is where you build presentation-ready reports to beautifully showcase all your data, so you can share insights with your clients and/or team.
First, click Reports in the sidebar. Then, choose what kind of report you want to build: Profile, Ads, Competitor, or Influencer.

Next, you can choose what data you want to include by selecting a profile/ad account/competitor/influencer and report time interval.
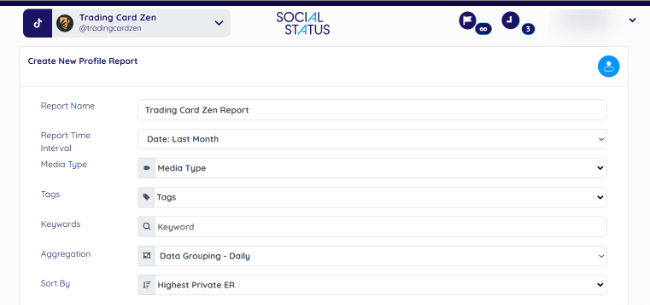
You’ll also need to choose what media types, keywords, tags, etc., to include, how you want to group data (daily, weekly, monthly, etc.), and what metrics you want to sort by.
If you want to automate your reporting, click the toggle next to Make this an ongoing scheduled report to turn it to the on position.

Then, choose how often you want to create the report (e.g., daily, weekly, monthly, quarterly, etc.), and enter the email addresses of the recipients you want to receive it. Social Status will send it straight to their inbox automatically, so you don’t have to.
If you just want to build a one-off report, leave the toggle off.
Finally, click Create.
Social Status will start generating it and send you a notification in the app or by email when it’s ready.
This can take a while, depending on the size. I waited over 10 minutes for a 7-day report, which is a bit disappointing. But once it’s ready, it should look something like this.

You can export reports in multiple formats, including PDF, PPTX, CSV, and XLSX (depending on your plan). I like how easy they are to read and how straightforward they are to build.
However, I do wish it offered more flexibility when it comes to choosing what to include. For instance, you can’t choose what specific metrics you want to include, as far as I know—it’s all or nothing.
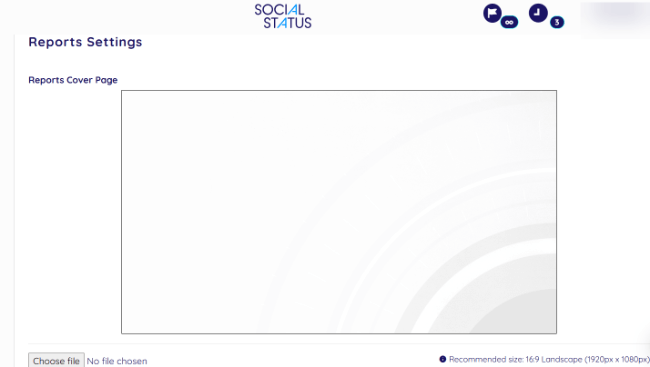
Another cool thing is that, depending on your plan, you can white label your reports by adding your own company logo in place of the Social Status logo, as well as your own cover page. You can set this up from the Settings tab.
How much does Social Status cost?
Social Status offers 9 different plans in total, designed to meet every use case and budget.
Each plan comes with different features, quota limits, and data history limits.
The Free plan is great for trying it out, but you’ll outgrow it quickly.
It has a Plan Quota of 1, which means you can only add a single social media profile, ad account, competitor, or influencer. It also only lets you look back over 1 month of data history, and comes with just the basic analytics features. You can’t export reports as a free user either.
There are four paid Small Business plans that are designed for—yep, you guessed it—small businesses (and social media managers, creators, and casual users).
I’d recommend the Essential plan. It costs $49/month, and you can get 25% off that if you sign up for yearly billing.
It has a Plan Quota of 40, which should be plenty for most users. Plus, 6 months of data history, and all the core analytics and reporting features (including white label reports).
If you’re a social media agency or large enterprise, you might be better off with one of the Professional Plans, which range from $99 to $1,499/month.
They come with much greater limits (up to 1,000 Plan Quotas and up to 3 years of data history. They also offer enterprise-grade features like API access and data warehouse automations.
Aside from the Free plan, you can also try out premium features for free for 7 days.
Social Status pros and cons
Now we’ve looked at everything Social Status has to offer, let’s consider its pros and cons. Here’s what I liked and didn’t like about it.
Pros
- Comprehensive social media analytics. Social Status is one of the only analytics tools I’ve tried that offers everything in one place. It’s not just for analyzing your profiles and posts, but also your ads, competitors, and influencers.
- Easy to use. I really like how straightforward Social Status is to use. You just add the profiles and accounts you want to analyze, then open up the reports. And if there’s something you don’t understand, you just hover over it for an explanation.
- Deep insights. Social Status goes beyond the basic metrics you get with native social media analytics tools, offering deeper insights. For instance, it’s one of the only tools I’ve tried that offers both public and private engagement rates.
- Fully automated reports. A lot of other social media analytics tools make you build reports manually, export them, and send them to your clients. Social Status automates that whole process so you can set it and forget it.
- Nice data visualizations. I love how easy Social Status makes it to understand the data. Well-designed graphs and charts visualize it for you in a way that makes sense and doesn’t give you a headache.
- Dedicated analytics tool. Usually, analytics is just one feature that all-in-one social media tools offer. As such, they don’t usually come with things like competitor or influencer analytics. And their development focus tends to lean towards publishing features. But with Social Status, you get a dedicated tool.
Cons
- Report generation speed could be improved. You get a snapshot of your analytics directly within the app but you can generate reports as well. These reports are a bit slower to generate than I’d like them to be.
- Limited report customization options. I wish you had the option to choose what specific metrics to include in your Social Status reports. As it stands, you can customize things like the reporting period and post types to add, but I don’t see any way to choose what metrics/KPIs to include.
- Limited data history (on some plans). It’d be great if Social Status offered a longer ‘look back’ period on its cheaper plans. Right now, free users can only view 1 month of data history, and even on the highest-priced Small Business plan (Essential), you’re capped at 6 months. If you want 1+ years of Data History, you need to upgrade to one of the expensive professional plans.
- No additional social media tools. Social Status is one of the only dedicated social media analytics tools on the market, so you don’t get all the bells and whistles you get with other ‘all-in-one’ solutions. For example, you can’t schedule posts or manage/reply to comments and messages.
- Doesn’t support all social networks. Social Status offers analytics for 6 platforms: Facebook, Instagram, TikTok, LinkedIn, YouTube, and X. While that’s all the important ones, it would be even better if it supported more niche networks like Pinterest, Reddit, Threads, and Bluesky.
Social Status alternatives
Not sure Social Status is right for you? Here are some of the best alternatives:
- SocialBee — The best alternative if you’d prefer an all-in-one solution. It doesn’t just offer social media analytics but also some of the best scheduling tools on the market. And its AI copilot is a game-changer.
- Viraly — Another all-in-one social media management toolkit with analytics, publishing, and more. Use it for insights into your performance, growth, and audience.
- Iconosquare — A powerful social media analytics, reporting, and scheduling tool with a fantastic user interface. It also gives you social listening insights, which is something you don’t get with Social Status.
Final thoughts
That concludes our complete Social Status review.
Overall, I’m convinced Social Status is the best dedicated social media analytics tool on the market right now.
It’s one of the only tools that combines organic and paid insights, influencer analytics, and competitor benchmarking in one package. It offers deeper insights and more metrics than most other tools I’ve tried, and it’s super easy to use.
However, like any other software, it isn’t perfect.
I’d recommend trying it out with the free trial to see if it’s the right fit for you.
Not sure what metrics to track with your analytics tool? Check out our guide to social media metrics and KPIs. Plus, learn how to build your social presence like the pros. Good luck!