Hopper HQ Review 2026: Is This Social Scheduler Worth Your Time?

Welcome to our honest Hopper HQ review.
Hopper HQ is one of the most popular social media scheduling and analytics tools on the market—but is it worth your time?
I wanted to find out, so I signed up and tried it out for myself. In this honest review, I’ll share everything I learned.
I’ll let you look over my shoulder as I test all of its key features. Then, we’ll review its strengths and weaknesses, talk about pricing, and discuss everything else you need to know to figure out if it’s the right choice for you.
What is Hopper HQ?
Hopper HQ is an all-in-one social media management tool designed to help you plan, create, schedule, and analyze content across multiple platforms from one place.

It was originally launched in 2015 as the world’s first automated Instagram scheduler.
And it still caters heavily to Instagram users, with a bunch of Instagram-specific features like first-comment scheduling and a drag-and-drop Instagram grid planner.
But since those early days, it’s evolved into a full-fledged social media management platform that also supports other networks, including Facebook, Instagram, X, LinkedIn, Pinterest, TikTok, YouTube Shorts, and even newer platforms like Bluesky.
At its core, Hopper HQ is designed to make content planning and scheduling as easy and visual as possible.
It comes loaded with an interactive calendar, content creation tools, analytics, and a bunch of other features to streamline your social media workflow.
Unlike some social media management platforms that feel bloated and complicated, Hopper HQ keeps things beginner-friendly and intuitive.
The platform’s clean, no-fuss user interface means you can hit the ground running without a steep learning curve.
What features does Hopper HQ offer?
Hopper HQ offers a lot of features, including:
- Scheduling & auto-publishing
- Analytics
- Link in bio
- Bulk uploads
- Hashtag research
- Team collaboration
Next, I’m going to let you look over my shoulder as I try out all of these features so you can see how they work. Here we go…
Getting started
The first step to getting set up with Hopper HQ is to connect your social accounts.
You’ll need to do this before you can start scheduling posts.
Hopper supports 8 different social media platforms: Facebook, Instagram, X, YouTube Shorts, TikTok, Pinterest, LinkedIn, and Bluesky.

Select the one you want to connect, then follow the instructions to log in and authorize it in the app, and you’re ready to go.
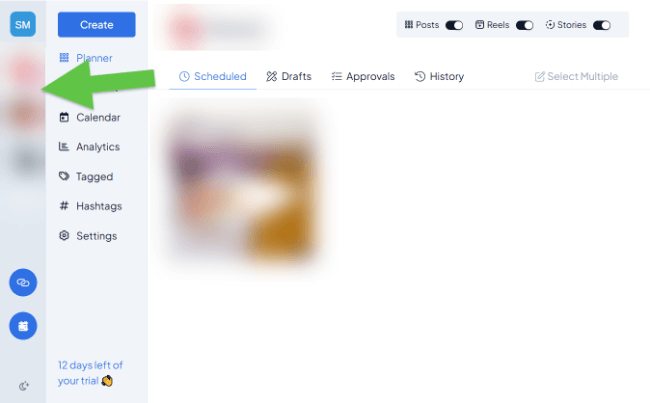
Once you’ve connected all your socials, you’ll see them in the sidebar on the left, where you can click them to switch between them.
Now we’re up and running, let’s look at some of the things we can do with HopperHQ…
Post scheduling
You can use Hopper HQ to plan, create, schedule, and auto-publish posts to all your connected social media accounts.
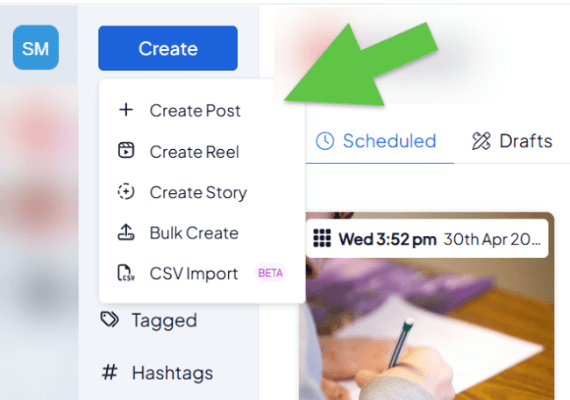
To get started, click Create in the sidebar. Then, choose the type of social media post you want to create. Hopper HQ supports most formats, including photo posts, Reels, Stories, and Carousels.
Once you’ve done that, you’ll be brought to the post composer. This is where you create your post content.
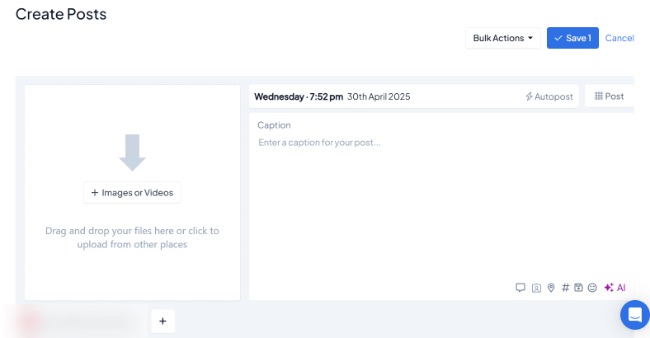
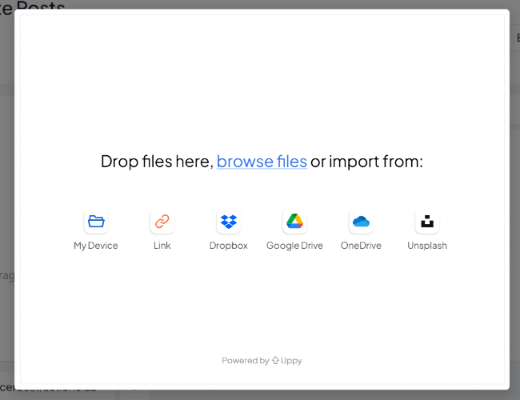
First, drag and drop any images/videos you want to post onto the image box on the page to upload them. Alternatively, you can click the image box to import media directly from Unsplash, Google Drive, Dropbox, and other integrations.
Next, add your caption on the right. You can click the icons at the bottom to do things like add collaborators, tag locations, add emojis, and more.
You can also click the # icon to search for hashtags to boost your post’s discoverability.
Just enter any relevant keyword, and Hopper will serve up a bunch of suggestions, along with the number of posts under that hashtag. Then, click the + icon next to any suggestion to add it.

You can also save your own hashtag lists to use again in future posts, but more on that later.
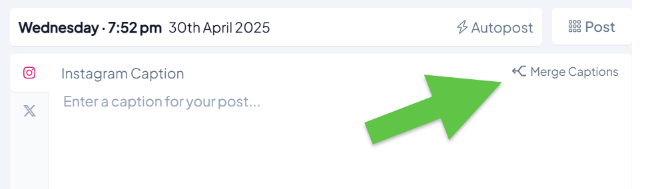
At the bottom of the page, choose the social media account(s) you want to share the post on. You can cross-post to multiple platforms at the same time by adding multiple accounts.
What’s cool is you can even customize your post for each platform. Just click Split Captions and create a separate version for each network as needed.
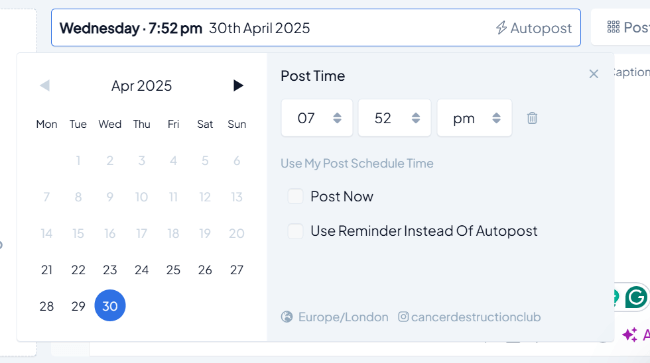
Once your post is ready, click on the date and time at the top to choose when you want it to go live.
You can opt for either autoposting (HopperHQ will publish it for you at the time/date you choose) or reminders (HopperHQ will remind you when it’s time to post so you can share it manually).
Once you’re done, click Save to schedule it or save it as a draft. You’ll be able to view, manage, and delete all created posts in the Planner.
First comment scheduling
If you’re scheduling an Instagram post, you can also have Hopper automatically add a comment on the post once it’s live.
This is a great way to hide your hashtags in the comments and give your posts an initial engagement boost.
To do so, just click the comment icon at the bottom of the post composer, then enter your comment in the text box.
Saved captions
One thing I like about Hopper HQ is that it lets you save post captions to use again later. This is a huge time-saver if you tend to repost a lot of content.
As you write your captions, just click the save icon at the bottom. Then, either write a caption from scratch or click Use current caption to save it to your library.
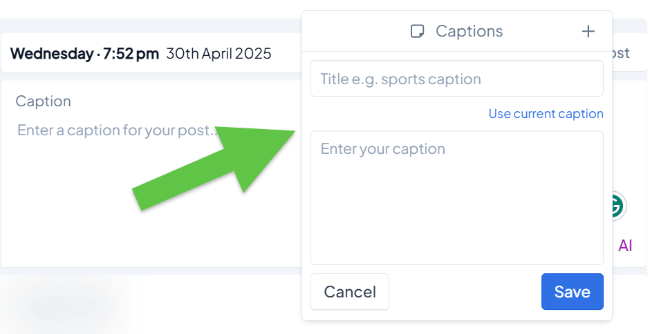
The next time you write a post and you want to use that caption, you’ll be able to select it and add it in one click.
AI generation
Speaking of time-saving features, Hopper HQ is now loaded with powerful generative AI.
In the post composer, click the AI icon at the bottom, and then choose whether you want to transform your text, generate a caption, or generate a hashtag.
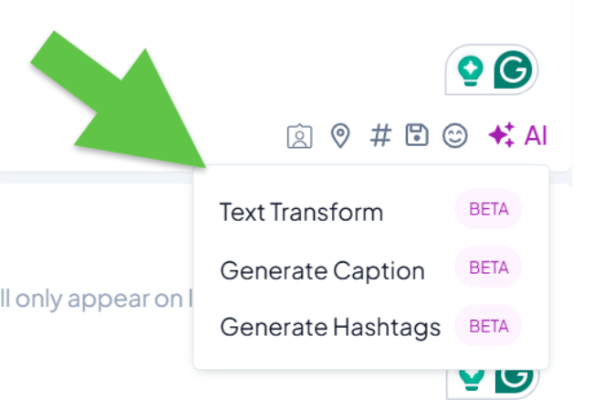
If you choose to generate a caption, the AI will craft the perfect caption for your image. Just let it know what tone you’re aiming for and it’ll do the rest.
It seems like the AI also looks over the existing posts on your account to see what your account is all about and then uses that context to guide its writing, which is pretty neat.
Image editing
Hopper HQ is loaded with basic image editing tools so you can touch up images for your posts in the app, without having to use any third-party tools.
Just hover the image in the post composer, then click Crop Image or Edit Image to open up the image editor.
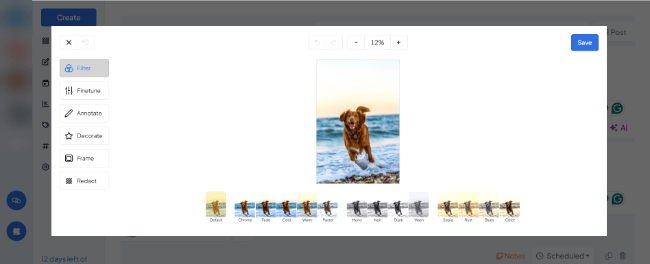
Things you can do here include add filters, adjust sliders (brightness, contrast, saturation, exposure, etc.), add annotations and decorations, add a frame, and redact/blur out parts of the image.
It’s nothing special, and it doesn’t come close to what you can do with real image editing software, but for basic touch-ups, it does the job.
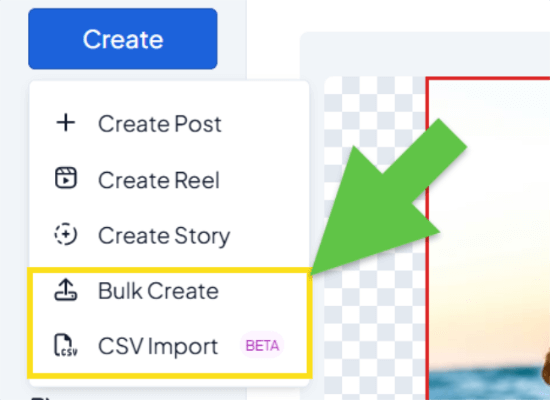
Bulk scheduling
Another neat thing about Hopper HQ is that it comes with bulk editing tools, so you can create, edit, and schedule large batches of posts in one go, as opposed to one by one.
This will save you a lot of time if you have a bunch of pre-prepared content ready to schedule.
To get started, click Create > Bulk Create. Then, drop all the media files you want to post onto the page, or import them.
Add all your captions in the post composer, then save them to your Planner.
You can also click the Bulk Actions toolbar at the top to perform batch tasks. For example, you can convert all posts to Stories or mark them all as drafts in one click.
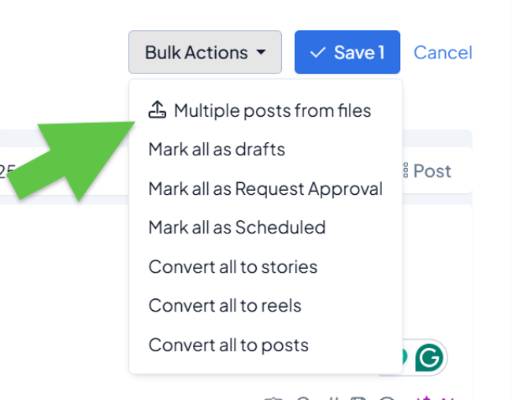
Once you’ve created your posts, you can also edit them in bulk using the Bulk edit tool in the sidebar.
Calendar
Click the Calendar tab in the sidebar to open up Hopper HQ’s interactive content calendar.

Here, you’ll be able to see all your scheduled posts within any given month at a glance, with thumbnail previews.
I really like the interface. It’s drag-and-drop, so you can effortlessly move posts from one date to another to reschedule them in seconds, without any hassle.
This is a lot faster than deleting the post and then rescheduling it from scratch, which is what you have to do on many other scheduling tools if you want to change the publishing date.
You can filter posts in the calendar by format (Stories, posts, reels) and status (scheduled, drafted, pending approval, failed, live).
Plus, click on any empty cell in the calendar to create and schedule a new post on that date without having to open up the post composer.
Grid planner
Hopper HQ also offers an Instagram Grid Planner, which shows up next to the content calendar.
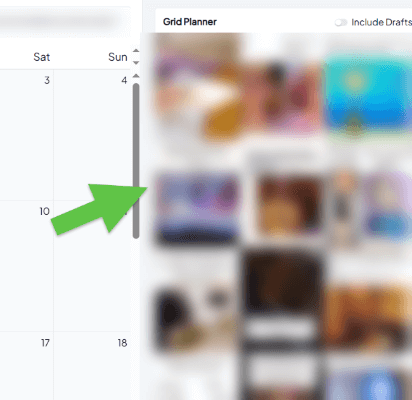
It shows you all your posts (including published and scheduled content) laid out in a 3-column replica of your Instagram feed, so you can see exactly how your page will look once your posts go live.
And like the calendar, you can drag and drop to move things around in the Grid Planner and reschedule them.
I love this feature as I’m a visual person and like to be able to ‘see’ my Instagram feed in advance as I’m planning.
However, I noticed that some types of content don’t seem to appear on the grid—like collab posts—so that’s something to keep in mind.
Analytics
Hopper HQ comes with built-in analytics to help you analyze your performance on social media.
Click the social media account you want to analyze, then select Analytics in the toolbar.
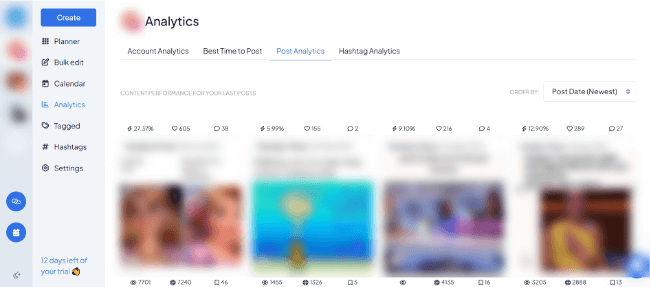
The social media metrics and insights you’ll see here will depend on the network.
For Instagram, you can see a list of your top posts by any metric (reach, likes, engagements, saves, etc.) under the Post Analytics tab, with KPIs like your average engagement rate for all of them.
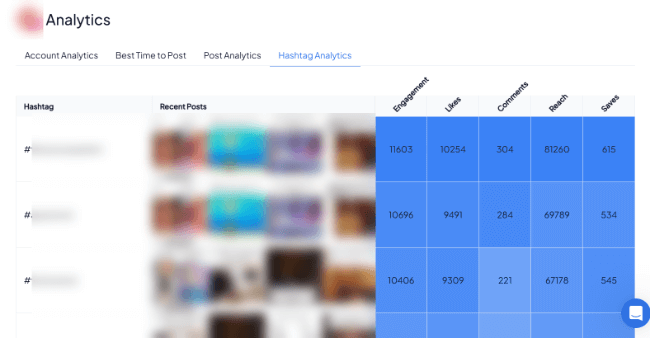
Under Hashtag Analytics, you’ll find a list of hashtags used in your recent posts alongside metrics like engagements, saves, comments, etc.
Elsewhere, you can find other useful insights to inform your strategy, like your best times to post (based on performance data), audience demographic insights (top countries, ages, etc.), account growth (follower changes, profile views, clicks, etc.), and more.
My one gripe with the analytics tool is that there doesn’t seem to be any way to export your data as reports.
I’d consider basic reporting functionality pretty essential for any social media analytics tool, so it’s disappointing that Hopper HQ doesn’t offer this.
Tagged post feed
Open up the Tagged tab in the toolbar to see all the posts your connected Instagram account has been tagged in.

This comes in super useful. For instance, if you’re a brand running a UGC competition or giveaway, you can use your Tagged feed to view all entries in one place.
In the corner of each tagged post, you’ll see two small buttons. You can click these to open the post in Instagram so you can like, comment, share, or repost it to your own channel.
Clicking the Repost button will copy all the post details over to the post composer, including the image and caption.
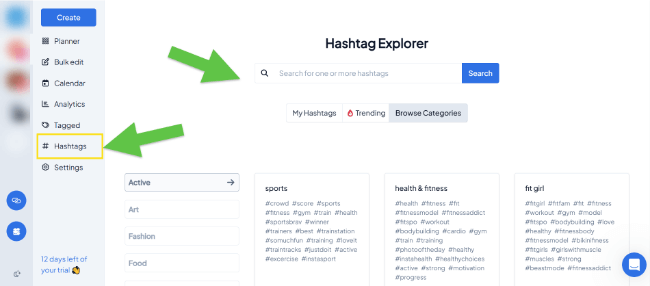
Hashtag explorer
The Hashtags Explorer is one of Hopper HQ’s most unique (and powerful) features. It’s an Instagram-specific tool that you can use to discover and analyze hashtags.
To get started, select your Instagram account, then click Hashtags in the sidebar.
Click Trending to see a list of the top trending hashtags on Instagram right now. Each hashtag comes with a bunch of metrics.
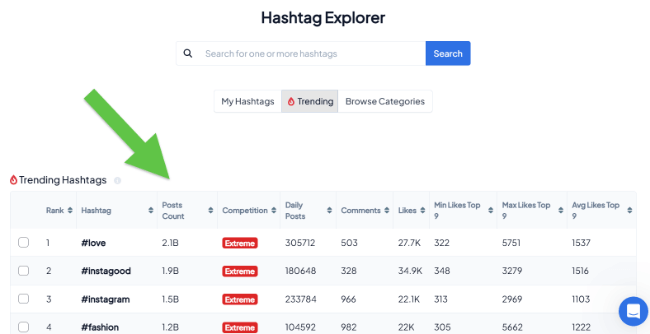
For instance, Hopper tells you how many posts are tagged with each hashtag, how many comments and likes each hashtag gets (on average), and how competitive they are (from Very Low to Extreme).
You can sort by any metric to quickly find the best hashtags for your campaigns. I like to sort by competition as I’ve found targeting hashtags with very low competition improves reach.
Aside from trending hashtags, you can also search for hashtags by category. Just click Browse Categories, then select your niche.
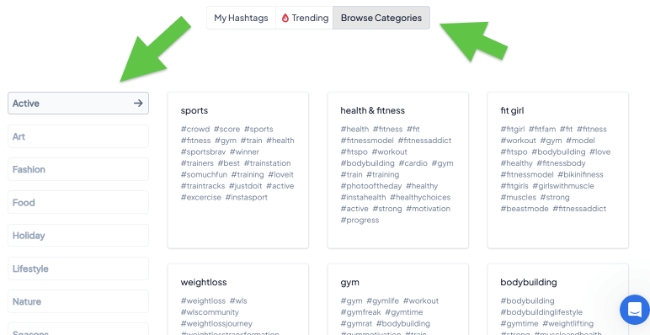
Alternatively, search for a keyword related to your post or niche to generate a ton of related hashtag suggestions.
When you see hashtags you want to use, tick the checkbox next to them to select them. Then, click Add To Group to create and save all selected suggestions to your own custom hashtag groups.
When you create a new post in Hopper HQ, you can add all the hashtags in any saved hashtag group to the post in one click. This saves a ton of time compared to adding them manually.
You can view and manage your hashtag groups under the My Hashtags tab in the Hashtags tool.
Link in bio
Hopper HQ also comes with a basic link in bio tool.
You can use it to create a custom landing page to keep all your important links in one place. Then, link to that page in your Instagram, TikTok, or other social media bios.
To get started, select Link In Bio in the sidebar.
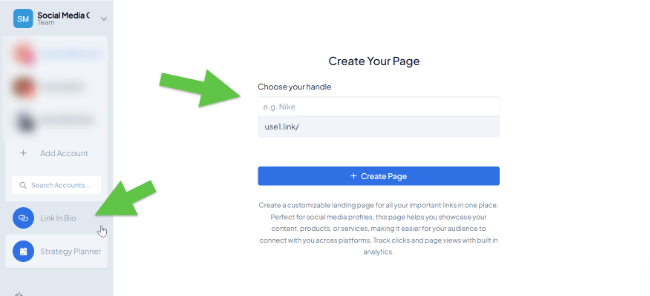
Next, choose a handle. This will appear in your custom URL. I’d recommend using your brand name.
After that, click + Create Page to open up the page builder. You’ll see a real-time preview of your biolink page on the right, and you can edit it on the left.
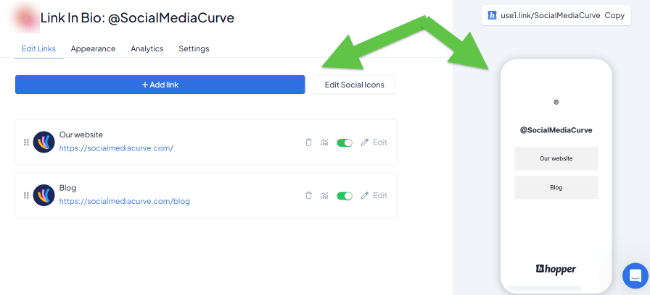
Start by clicking + Add link to add all the links you want to promote on social media, and use the drag-and-drop functionality to rearrange them as needed.
Next, click the Appearance tab to change your profile picture and add a page title and bio.
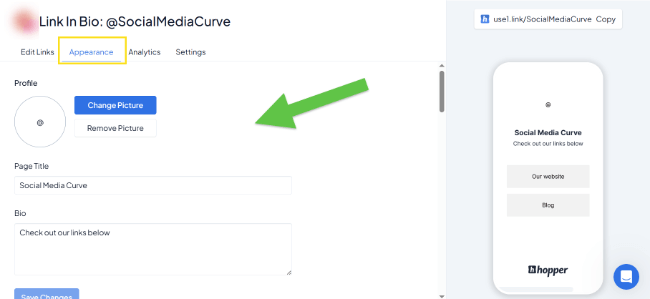
Here, you can also add social icons that link to all your profiles. Plus, customize the way your page looks by changing the theme, background color, fonts, button designs, etc.
You don’t have a lot of flexibility when it comes to customization—you can’t change the layout or do things like add custom images and videos—but if you just want a simple biolink page, it does the job.
Once you’re done, click Copy to grab your shorturl and add it to your bio.
You can come back to the Link In Bio tool and open up the Analytics tab at any time to view useful page analytics.
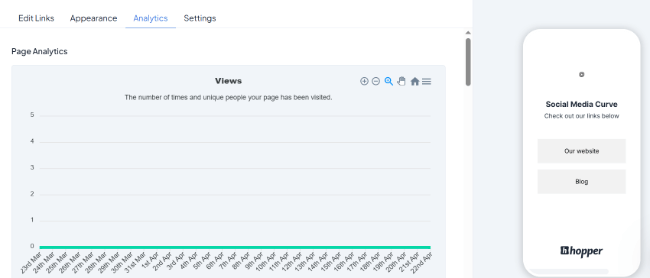
For instance, you’ll be able to see insights like your page views over time, visitor locations, referral sources, etc. Plus, track link clicks, CPV, and so on.
Strategy planner
The Strategy Planner is a new feature that’s still in Beta testing (at the time of writing), but it seems very promising.
It’s an AI-powered tool that can plan a tailored social media strategy for you based on your posting history, engagement patterns, and audience insights.
To get started, open it up in the sidebar. Then, select the social media accounts you want to include in the strategy.

It takes a while to analyze your accounts. Once it’s done, it’ll serve up an analysis of your social media identity, goals/purpose, key challenges and opportunities, and so on.
Then, it’ll provide a personalized plan based on that analysis, complete with an executive summary, strategy goals, and a 3-week content calendar plan (with post ideas and suggested timings)
Click on any post in the Strategy Planner calendar to open up the post composer. It’ll be pre-populated with caption, content, and hashtag ideas. Then, you can customize each post and start scheduling.
I was impressed by how well the Strategy Planner worked in my tests. It was a little sluggish, and the analysis took longer than I thought it would. It also froze a few times and had to be restarted, so I think it’s a little buggy.
But, looking past that, it still managed to complete what would usually take days of work in minutes. And the strategy it created was as good as anything I could come up with myself, so I can see this being a huge time-saver for creators and social media managers once they iron out the kinks.
Team collaboration
Hopper HQ has been built with teams in mind and can help you to collaborate more effectively on your social media campaigns.
The first thing you’ll need to do is add your team to your account. Hopper HQ comes with unlimited user seats as standard, so you can add as many members as you want.
To get started, click your profile icon in the sidebar, then click Invite Teammates.

Next, enter their email address to send them an invite. As you do this, you’ll be prompted to set their account permission level.
For instance, you can limit your writers/designers to only being able to create drafts (so you or your team leaders can approve them before they’re scheduled).
If you work with clients, you can give them read-only permissions, so they can see scheduled posts to approve them, but can’t create or edit them. You get the idea.
You can communicate with your team in the app through internal Notes, which you can add to the calendar, to posts, etc.
Plus, when you create a new post, change the toggle to Request approval to set up approval workflows.
How much does Hopper HQ cost?
Hopper HQ offers just one standard plan.
It costs $19/month (or $16/month if you pay annually) and includes everything: Unlimited post scheduling, unlimited users, and access to all the features we’ve looked at.
The catch is you pay per social set. For the base price, you can only connect one account on each platform (Instagram, Facebook, X, LinkedIn, etc.). So, for example, if you want to connect a second Instagram account, you’ll pay double.
You can get started with a 14-day free trial.
Note: Hopper HQ also offers an Enterprise plan, but it’s only really useful for very large businesses and agencies—most users will be fine on the regular plan.
The Enterprise plan comes with more advanced analytics tools (from Measure Studio) and a few other perks. There’s no set price for it, so you’ll need to book a call with Hopper HQ and speak to them for a quote.
Hopper HQ pros and cons
Having tested out Hopper HQ extensively, here’s my take on its biggest pros and cons.
Pros
- Great UI and UX. Hopper HQ gets top marks for usability. Its user interface is fantastic. I love the drag-and-drop calendar and planning grid, and how easy it is to switch between different tools. Everything just works together seamlessly.
- Perfect for Instagram. A lot of Hopper HQ’s features seem to have been built specifically for Instagram. For instance, the planning grid, link in bio tool, and hashtag research tools. This makes it a good choice for brands and creators that focus mainly on Instagram.
- Cost-effective for teams. Hopper HQ is one of the only social media management tools I’ve tried that lets you add unlimited users without paying extra. This makes it fantastic value for money for teams. It also has solid collaboration features, and its workflow has clearly been built with teams in mind.
- No feature gating. I like how Hopper HQ doesn’t lock important features behind higher-priced plans. The standard plan includes everything out of the box, and it’s super affordable.
Cons
- No reporting functionality. My biggest gripe with Hopper HQ is that you can’t use it to build social media reports, as far as I know. Most other social media management tools offer at least basic reporting features, and some even offer automated and white-label reporting, so Hopper HQ falls short there.
- No workspaces. It would be great if you could set up separate workspaces to manage different brands/social sets within your Hopper HQ account. There’s no way to do this currently as far as I can see, which might be a problem for agencies/SMMs that work with multiple brands,
- No category-based scheduling. You have to schedule posts individually on Hopper HQ. You can’t bucket them together into categories or themes and then schedule whole categories like you can with some other publishing tools.
Hopper HQ alternatives
Not convinced that Hopper HQ is the right choice for you? Here are some alternatives worth checking out.
- Viraly — An all-in-one social media scheduler that offers multi-platform publishing, analytics, team collaboration features, and more.
- Pallyy — Another good choice for brands/creators focusing on Instagram. Its user interface is excellent, and I love its drag-and-drop content calendar.
- SocialBee — One of the most advanced social schedulers. It can do pretty much everything Hopper can. Plus, it offers category-based scheduling, and its AI Copilot feature is even better than Hopper’s Strategy Planner.
Final thoughts
That concludes our in-depth Hopper HQ review.
My final verdict: Hopper HQ is a solid social media scheduling and analytics tool, especially for teams and anyone who’s mainly focused on Instagram.
What really sets Hopper HQ apart is its intuitive and well-designed user interface. It’s incredibly easy to use and beginner-friendly. In particular, I love its drag-and-drop content calendar and grid planner.
Its hashtag research tool is another one of its biggest strengths. Most other social media management tools don’t offer anything like it.
That said, Hopper HQ is missing a few important features, like social media reporting and category-based scheduling. But if you can do without those, it’s definitely worth checking out.
If you want to try it out for yourself, you can click the button below to sign up for a free trial. Good luck!